Client
Device Radio [Einride]
Year
2017
My role
Material research
Prototyping
Mechanical design
Manufacturing
Physical design
Project type
Freelance consultant
Location
Malmö
Methods
Sketching
Joinery
Laser cutting
Body storming
Physical prototyping
I was contracted as freelance consultant I was to design and manufacture a physical desktop and interface for remotely overriding the control of self-driving trucks, Einride's T-POD, for a live and public presentation.
remote manual INTERFACE FOR
AUTONOMOUS trucks.

My involvement in this project came late. With just a few weeks until deadline I was contracted to design and manufacture some of the major parts of a fully functional prototype of physical interface for remote manual control of self-driving trucks.
The company that approached me was Malmö based Device Radio who had developed infrastructure for IoT communication. They were in turn on contract with Swedish/German auto innovation company Einride.
Simply put: Einride had the trucks and money to invest, Device radio had the software, I would have much of the physical control interface.
And this is how it happened...
I got the first call in May and got the outline. Pretty much as detailed as is written out above.
Deadline was just a few weeks ahead and the deadline was razor sharp. The outcome was to be presented at Almedalsveckan in July.
We settled on me taking on designing and manufacturing of the desktop. All customized to fit an existing adjustable desk frame and monitor, as well as embedded touch screens, and slidable and steering wheel. The aesthetic keyword was office, rather than truck interior. This piece of furniture should fit within a furnished office space without feeling like a too much like machinery interface.
The retractable, or sliding, steering wheel also ended on my table. It was clear that the software was in place but there was no solution for how to physically construct and manufacture the control. The steering wheel was to steer left and right obviously, but also be the input for speed control. Pulling the wheel for lowering speed and push for acceleration. More on this later.
This kind of work is something I’m much familiar and comfortable with from my time at Galleri Form. The real challenge here was the timeframe. Note that I was working full time as lecturer at Malmö University and this was something I took-on on pure passion. I mean, why wouldn’t I want to engage in designing, constructing, and manufacturing something like a flight control inspired interface for overriding the controls of self-driving trucks? In 2017 this all seemed like a step into the future. But again, the deadline was close around the corner, and I had only evenings and a few weekends to put in. In the end the project seemed interesting enough and quite frankly I got paid enough to give it my all over the remaining weeks.
I started with meeting up with the team at Device Radio and informed myself of who’s doing what and who to reach out to regarding the different areas of the project.
I got briefed about what was still being crunched regarding the software and was able to take measurements of the existing physical parts like the desk frame and different monitors.
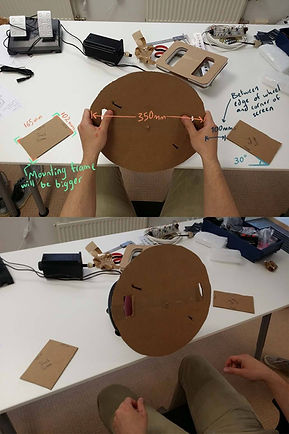
We also got to do some lo-fi carboard prototyping and body storming of the user experience and ergonomics.

Here the Device radio team can be seen having fun. With an old racing game control and cardboard we tried out how to position, angle and distance the the controls. This gave me the main measurements for beginning to sketch out the desktop.
With information in the bag regarding dimensions and a better understanding of what needed to be done with the steering wheel I raced home and ordered in suitable wood for the desktop, and collected compact laminate for the construction of the steering wheel.
I choose massive walnut for the desktop. Not prime walnut but a cheaper sorting with variations in colour, both due to the fast delivery of that particular piece of wood as well as walnut being easy to mill, fairly easy to glue, and mount screws in. Dense and hard without too much tendency to crack or split. The walnut's colour variations are also quite forgiving. And since time and efficiency clearly was key elements of this project it seemed a perfect fit.
As for the fairly sophisticated and exact construction of the steering wheel mount I choose compact laminate. Perhaps slightly over-kill, but it just so happened to be that I got some material lying around from a previous project. If I hadn’t had that I would have settled with prime plywood for this construction. But the compact laminate is nice to work with. Extremely dense and hard (also very dulling of the tools used to manipulate it....). Treat it like aluminium and you’re close to the truth. For constructions with high demand on exact geometries and dimensions without any movement whatsoever it’s a quite lovely material.
A few days passed with me consumed in teaching activities at Uni.
I still got to do some sketching of the desktop geometry and optimising in relation to the piece of wood I ordered.
When the wood arrived, I got to work!

While I could design the desktop and placement of the screens and steering wheel, the details of the steering wheel mechanics was still tricky to imagine on paper.
Screens and steering wheel,
cardboard prototype.

By dividing the standard 600 mm board like this, and joining it it this angled manner I could produce a surface that was experienced as much larger and keep the desk it self light both literally and figuratively.

Milled out pockets for integrated screen interface, steering wheel, and desk frame with screen mount, as well as chamfered edges on the bottom edge of the desktop.
With the major piece of wood looking all right and well I left it to rest and got working on the different fittings and mounting of technology. Such as the steering wheel and embedded screens. The screens would need to be fitted snuggly and flush with the desktop and required some time and loving care to be perfect.
The wheel was a chapter in and of itself...
Let's take a second to consider automation within in the transport industry, getting from A to B to load and/or off load cargo. In this case it's the automation of transport that's in focus and not the loading and unloading of cargo. This took place in 2017 and automation of transportation along as well highways and the smaller road grid was put to test all around the world. Designing for and testing the details for what's to happen once arrived at "B" wasn't really the top concern. What companies do on their own pavement wasn't as much of a public concern. Nevertheless a design and engineering problem. Loading docks are standardised in many ways, such as hight for instance to fit international fleets of cargo trucks. But the placement of loading docks and how to position the trucks to them was not automated 2017 by Einride. That's why a manual override of the control was motivated. To do the last little bit of driving, getting the final details perfect for loading or unloading whatever is carried.
Imagine this scenario: Numerous T-PODs (that's what Einride called their truck) are simultaneously carrying cargo all over the map. We have a person watching dots on a map move and monitor that everything runs smoothly. Many dots on the map depart from A and arrive all the way at B without any hiccups. The loading and unloading docks at these places have infrastructure to support autonomous trucks.
But some don't, some have the need for ad hoc manual support. It could be due to anything from the cargo being loaded from a place not usually used for loading or unloading, to the business shipping cargo being of a smaller scale than that such infrastructural investments could motivated. In either case manual remote control of the trucks are motivated. Then our monitoring person can select the dot on the map in need of manual support to remotely control and position the truck. The control panel tune in to all of the truck's cameras and sensors and the physical interface, much of interest me and you reading this, comes at play. When done with the task perhaps a few other trucks have positioned themselves in queue for manual support and our monitoring person can deal with them one after another. All while most of the trucks are doing their business without any need for manual override.
This scenario help us frame the context in which we are designing.
It's not about overriding the trucks while cruising along a highway, but rather when crawling over loading/unloading area getting in position for a standstill. This tells us a few things: the maximum speed of the manual control is low. As long as walking pace actually, and that precision and exact control is of essence.
As mentioned before the steering wheel would not only serve to control the steering of the wheels, but also to manipulate the speed of the vehicle, by pulling and pushing the whole wheel along a guiding rail.
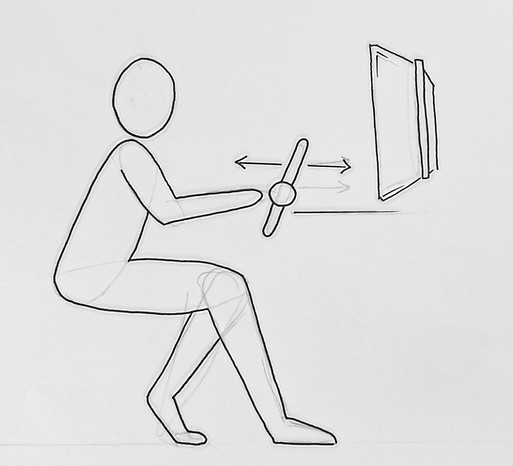
Steering wheel movable back- and forward.
The manual manipulation of the speed and direction needed to be such that it required active physical interaction for going forward or backward, but that no action would leave the vehicle to a standstill. That was what the software supported and that was how the hardware needed to act.
In practise this meant that when one let go of the steering wheel it needed to automatically return to neutral position.
Thoughts on different motors came to mind for resetting the steering wheel, but have I told you time was a factor? I believe I did.
We ended up settling on good old fashion springs. More on that below.

So, my task was to construct a mount for the motor/sensor for the steering wheel that also leapt along a linear rail, or guide, for speed manipulation. As you can see it the cuts being made to the desktop above I had an idea of how to do it. It was now a matter of pulling it off and getting all mechanics to work.
The manual manipulation of the speed and direction needed to be such that it required active physical interaction for going forward or backward, but that no action would leave the vehicle to a standstill. That was what the software supported and that was how the hardware needed to act.
In practise this meant that when one let go of the steering wheel it needed to automatically return to neutral position.
Thoughts on different motors came to mind for resetting the steering wheel, but have I told you time was a factor? I believe I did.
We ended up settling on good old fashion springs. More on that below.


Starting with getting the angle set up.
RIGHT:
Test assembly and mounting
of the motor.


LEFT: Testing and trying out the position for the guiding mechanic running along a straight rod underneath the desktop.
RIGHT: These are the toy spring tensioned dampers used to center the steering wheel when not actively pushed or pulled. The spring of course adding linear force and the gas damper keeping the movement controlled and smooth. These were mounted in pairs opposite of each-other to push from both sides centering the whole steering wheel apparatus.
BELOW: As you can see here there's actually place for three dampers on each side. Since I can't begin to calculate the force and experience of the dampers I settled on that we need to practically try it out to figure out how many is should be mounted for a good experience.
And as mentioned: 2 on each side was the best choice.


So this whole construction was hung on the guiding rods under neath the desktop with the steering wheel and sensor pertruding on top, all snuggle fit in the cutout made in the desktop.
There was quite a lot of work to be done fitting the front pair the dampers directly on the desktop and getting the guiding rods and mechanics in place as well. But did I mention time was a factor? I'm sure I did. At the time of getting that mounted and functional I must have not prioritised to photograph...
Looking at the face of the wheel...
You might notice on the right image above there's a quite handsomely crafted walnut cover with a suitable logotype laser engraved on it. As a final touch I also took it upon myself to craft cover for the sensors mounted on the wheel and add a touch of car industry to the look and feel of the prototype. Looks rather elegant if I'm to assess it myself.


I assembled everything at the Device Radio office in Malmö. Had it up and running together with their team and packed it all up for overnight shipping to Almedalen. I got told the presentation and demo was a success and that the craftsmanship was celebrated. I couldn't go with to Almedalen myself. I was back at Uni the next morning. That pretty much concludes the story of how I worked in this project.
The images and video seen below are from the demonstration and taken by Device Radio and are granted me to use and share.
I believe this is also a good place on this site to share some of the media coverage from the demonstration in which my work is seen.
Aktuell Hållbarhet: link here
Fullyloaded.com: link here
Plugin magazine: link here


Fast paced and complex.
Given the amount of time I'd say I produced a rather complex prototype that served it's purpose at the demonstration. I would also say that my design process, although compromised by the timeframe, was rich and iterative to some extent.
The manufacturing process would perhaps give my old woodworks mentor nightmares but the result came out presentable and good looking as well as sturdy and functional.
The reason I find this case interesting from a personal point of view is that it evidence that a small team came make huge impact and create innovation in both digital and physical form. I'm quite happy with what we accomplished with this project.